
The Godly Play Circle of the Church Year Vol.2 Lesson 1 uses a wooden presentation set. The pieces are moved throughout the telling of the story and there are three clock hands for the three great events.
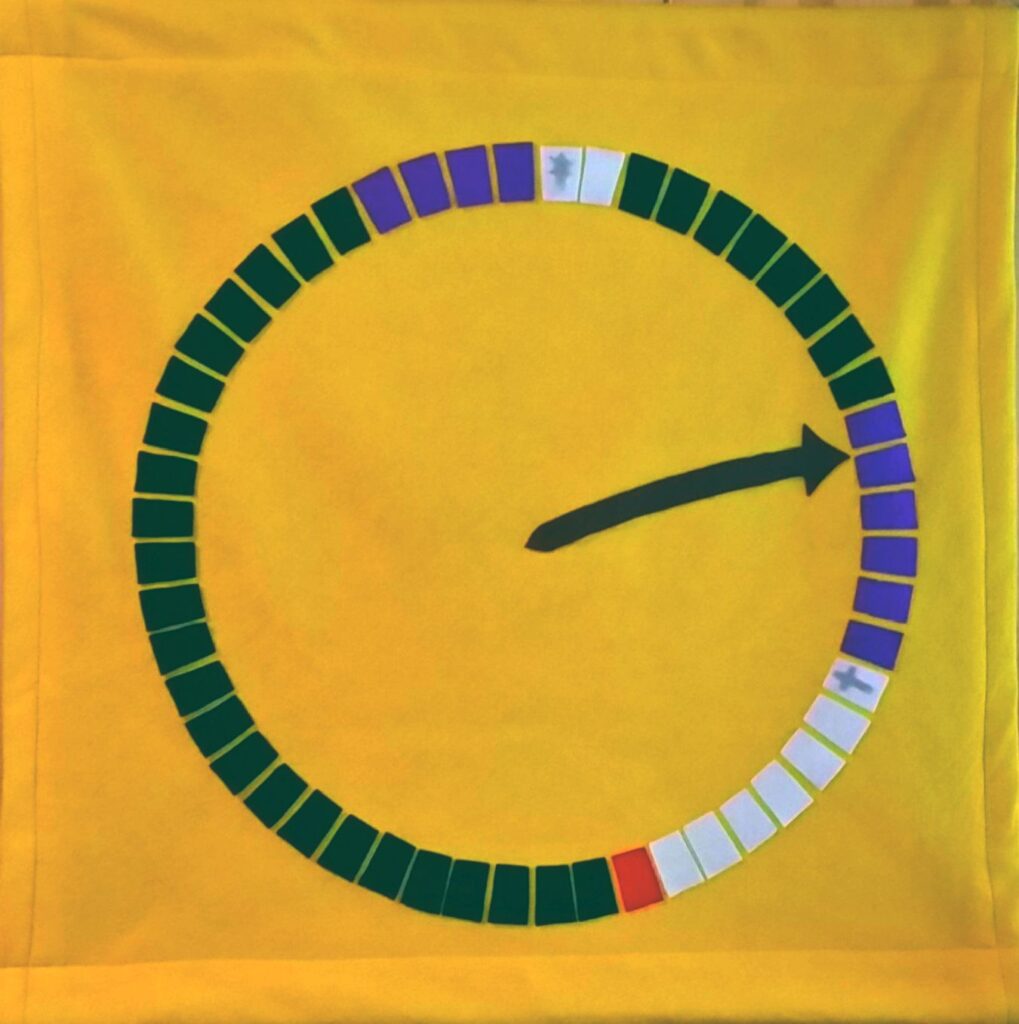
Once you have told this story, a wall hanging is a great way to reinforce the cycle and allow the group to keep track of where they are each week in the liturgical calendar.
I made one for less than $20 to make and it took ±3 hours (with interruptions).
Steps with pictures:

Gather your supplies:
– small piece of cardboard to cut your template for the small pieces
– tiny bit of red felt (enough for 1 calendar block)
– white felt (enough for 9 calendar blocks)
– purple felt (enough for 10 calendar blocks)
– green felt (enough for 32 calendar blocks)
– tiny bit of grey or silver fabric for the Christmas star and Easter cross
– large piece of felt in background colour (something different from the others)
– sharp fabric scissors
– pencil
– measuring tape
– a round template that fits on your background, to help you plan the layout
(I used a laundry basket lid, but anything will do really)
– fabric glue
– Dowelling or balsa wood for top and bottom of the hanging
– string ±1m
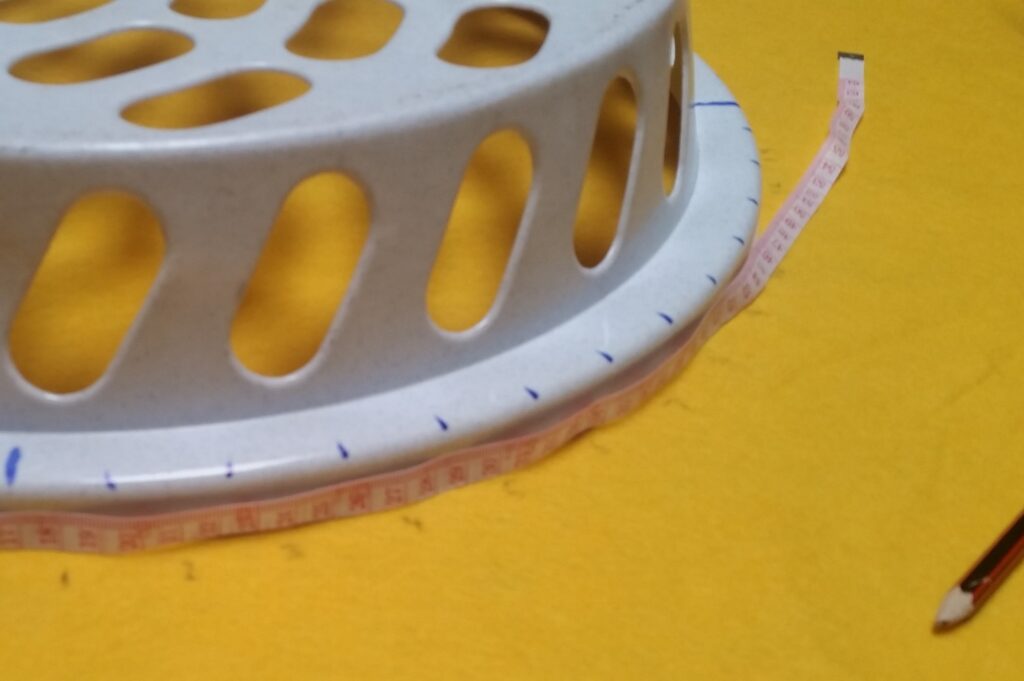
Measure and mark up your circle template. This is the hardest part of the project, but once done it all falls into place easily:
– The round template needs to be marked into four quadrants, with a sharpie mark at 90, 180, 270 and 360 degrees. Each of these quadrants will hold 13 of your week blocks, to total 52 around the circle.
– Using the measuring tape wrapped around the edge of the template, calculate the circumference of one quarter, divide it by 13 and that is the width of each piece. e.g. – my laundry lid was 39cm from one mark to the the next, divided by 13 pieces, makes 3cm for each piece.
– Put a mark with the sharpie at every 3cm (or whatever your measurement was).
– Repeat for the other quadrants until the whole template is marked up.

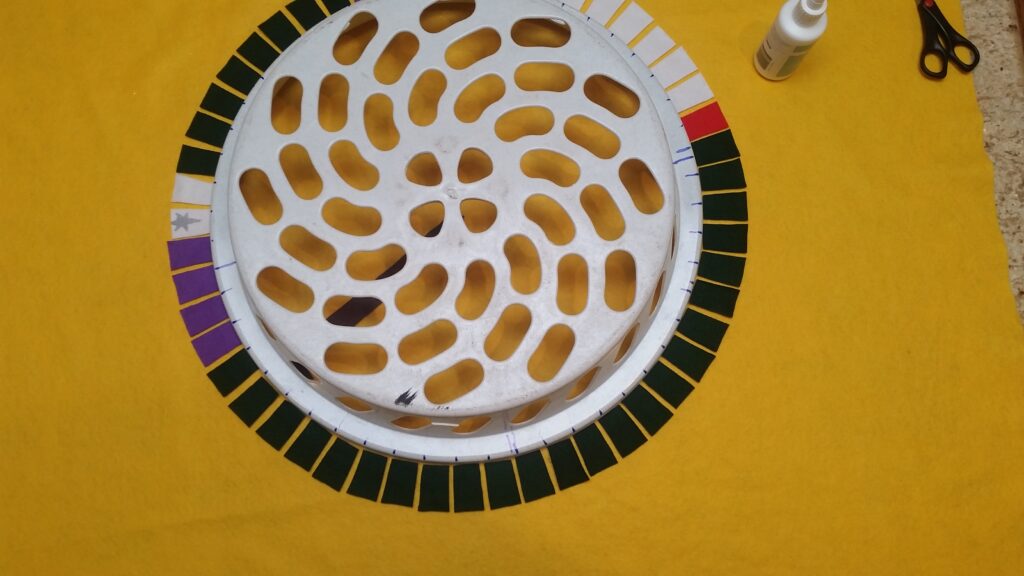
Once marked up, place your template on the centre of the background colour. Count your segments and mark them off on the background with a pencil. Mark from 1 to 52. Check. Double check. If you get it right now you will be fine.
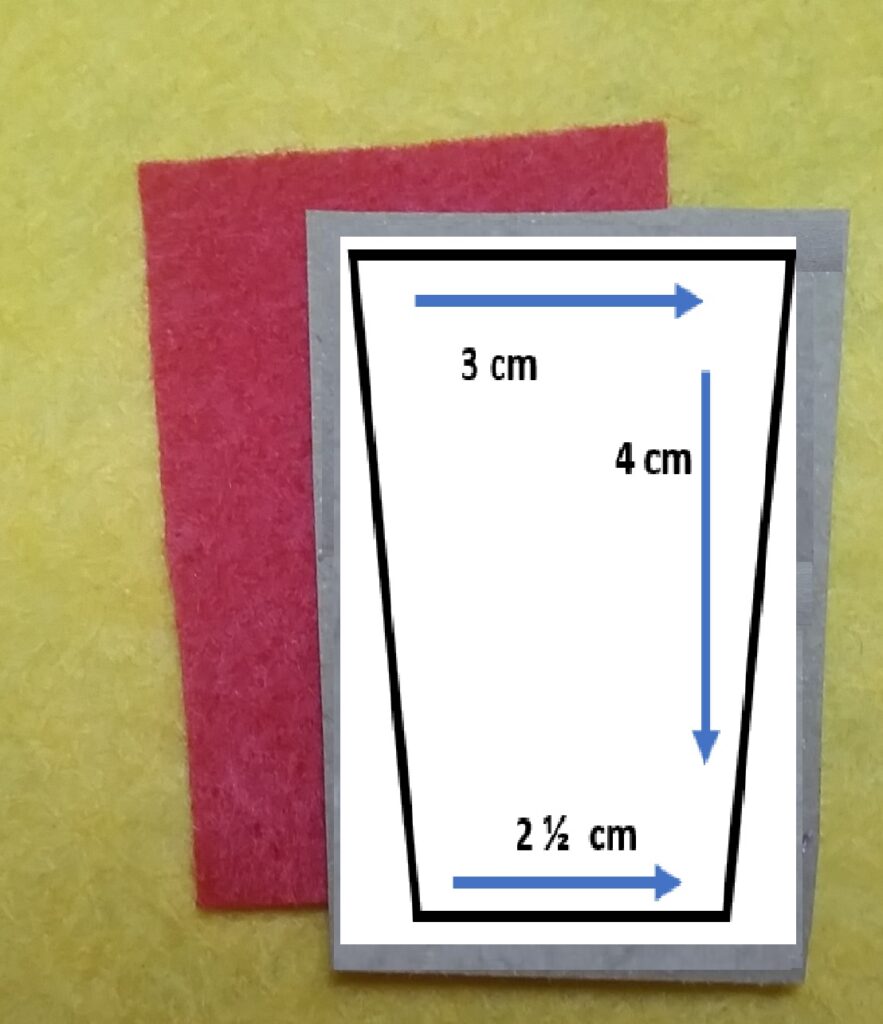
Now make the cardboard template to cut your blocks out. The width of the template should be the same as the width of each segment on your circle template. Mine was 3cm. I made each block 4cm long, Then, because of the circular fit, the bottom of the template must be a little shorter than the top. So, trim a tiny bit off each side to make a symmetrical trapezium.
Cut out blocks, using the template:
– 1 red
– 9 white
– 10 purple
– 32 green

Cut out a star and a cross and glue them onto a white block each.

Cut out an arrow-shaped clock-hand from dark felt. This won’t be stuck on, as it must be moved each week. The felt will just hold on to the background like fuzzy-felt pictures.
The order of the segments will depend on your church’s liturgical calendar. The one we use goes; 4 x purple for advent, 2 x white for Christmas, 8 x green, 6 x purple for lent, 7 x white for Easter, 1 x red for Pentecost, 24 x green for ordinary time.
Lay the blocks out around the circle template, matching to the edge and spacing them evenly, then glue them on with a splash of fabric glue.
Hem the side edges (optional) – it you are comfortable doing straight seams on the sewing machine you can hem the edges, but this is not necessary as felt won’t fray.
Fold under the top and bottom edges and secure with a straight seam (leaving sides open) – this will make a tunnel for the wood pieces to slide into.
Slide the wood in to the top and bottom to give it weight and make it hang tidily.
Connect the string to the ends of the top wood.
Hang it up and enjoy getting the group to move the arrow each week.
Steps (text only):
- Gather your supplies:
– small piece of cardboard to cut your template for the small pieces
– tiny bit of red felt (enough for 1 calendar block)
– white felt (enough for 9 calendar blocks)
– purple felt (enough for 10 calendar blocks)
– green felt (enough for 32 calendar blocks)
– tiny bit of grey or silver fabric for the Christmas star and Easter cross
– large piece of felt in background colour (something different from the others)
– sharp fabric scissors
– pencil
– measuring tape
– a round template that fits on your background, to help you plan the layout
(I used a laundry basket lid, but anything will do really)
– fabric glue
– Dowelling or balsa wood for top and bottom of the hanging
– string ±1m - Measure and mark up your circle template. This is the hardest part of the project, but once done it all falls into place easily:
– The round template needs to be marked into four quadrants, with a sharpie mark at 90, 180, 270 and 360 degrees. Each of these quadrants will hold 13 of your week blocks, to total 52 around the circle.
– Using the measuring tape wrapped around the edge of the template, calculate the circumference of one quarter, divide it by 13 and that is the width of each piece. e.g. – my laundry lid was 39cm from one mark to the the next, divided by 13 pieces, makes 3cm for each piece.
– Put a mark with the sharpie at every 3cm (or whatever your measurement was).
– Repeat for the other quadrants until the whole template is marked up. - Once marked up, place your template on the centre of the background colour. Count your segments and mark them off on the background with a pencil. Mark from 1 to 52. Check. Double check. If you get it right now you will be fine.
- Now make the cardboard template to cut your blocks out. The width of the template should be the same as the width of each segment on your circle template. Mine was 3cm. I made each block 4cm long, Then, because of the circular fit, the bottom of the template must be a little shorter than the top. So, trim a tiny bit off each side to make a symmetrical trapezium.
Cut out blocks, using the template:
– 1 red
– 9 white
– 10 purple
– 32 green - Cut out a star and a cross and glue them onto a white block each.
- Cut out an arrow-shaped clock-hand from dark felt. This won’t be stuck on, as it must be moved each week. The felt will just hold on to the background like fuzzy-felt pictures.
- The order of the segments will depend on your church’s liturgical calendar. The one we use goes; 4 x purple for advent, 2 x white for Christmas, 8 x green, 6 x purple for lent, 7 x white for Easter, 1 x red for Pentecost, 24 x green for ordinary time.
Lay the blocks out around the circle template, matching to the edge and spacing them evenly, then glue them on with a splash of fabric glue. - Hem the side edges (optional) – it you are comfortable doing straight seams on the sewing machine you can hem the edges, but this is not necessary as felt won’t fray.
Fold under the top and bottom edges and secure with a straight seam (leaving sides open) – this will make a tunnel for the wood pieces to slide into.
Slide the wood in to the top and bottom to give it weight and make it hang tidily.
Connect the string to the ends of the top wood.
Hang it up and enjoy getting the group to move the arrow each week.